Feb 13, 2013

Tutorial: Transform and roll out!


My favorite robot in the world is Optimus Prime from Transformers. (Marvin from Hitchhiker's Guide to Galaxy comes second!)
Image from Google

For long I have wanted to do a look based on Optimus, I just haven't quite figured how to transform it to makeup (hehe. Transform the transformer.. :D )

Then finally it hit me. The flames of the "new Optimus"!
Image from Google
Image from Google

Few days ago I made the sketch for the look;

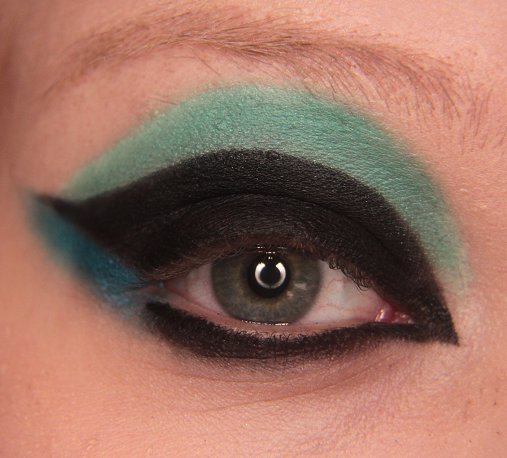
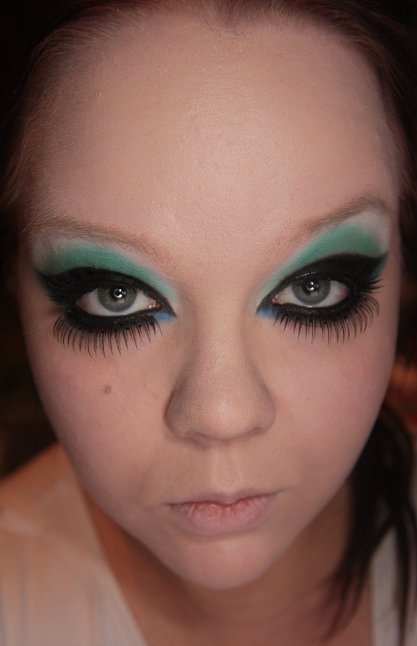
And here's how it turned out when I today had time to do it:


I look happy :S

One straight from phone:

Then the fun part!

TUTORIAL!

I started with priming my lid with Lime Crime Eyeshadow Helper (It comes in tube now, awesome!)

Then I outlined the flames with Makeup Geek's Electric gel liner (Using superthin brush from Joe Blasco):

Then I used Sugarpill Buttercupcake, Love+ and Flamepoint to color the non-blue flames:

 Then Sugarpill Buttercupcake, Flamepoint and Tako to blend:

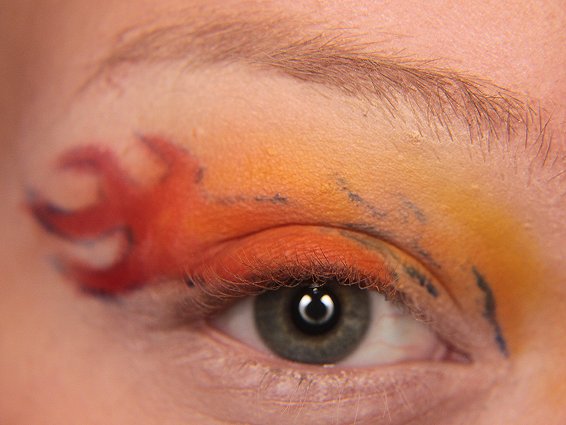
Then I used MUG Electric liner again to fill the blue flames:

And then Sugarpill Velocity over the Electric gel liner to seal it and to make it a bit more metallic:

Then some Electric and Velocity to lower lashline too...:

Red lip pencil to the brow, with some Lime Crime Fly Dragon Fly, and black gel liner to waterline:

Mascara...:

And finally quite neutral falsies (Red Cherry #13 I think):

And the look is done!


Diu-di-diu-di-diu!

Feb 5, 2013

Still Alive

I'm still here.

As you may have noticed, I haven't posted anything in several months, and I'm truly sorry that I disappeared without any explanation or anything.

I didn't feel like applying bright/ interesting makeup and as I didn't do anything cool/pretty, I didn't have anything to share or write about.

Most of my daily looks since November have been either neutrals or basic smokey eyes. Some days even just plain mascara, and nothing else. My inspiration and will to apply makeup was totally gone.
I used makeup because I had to, not because I wanted to.


On top of all this, my camera started to act weird. Pics were weirdly toned, out of focus, too bright/too dark (despite the settings). So if I happened to get an inspiration, I didn't get a decent photo of the look.

During January I had to get myself a new phone, and my new phone has a pretty good camera (not as good as D-SLR of course, but good for a phone camera), and I have started slowly doing and photographing my looks again:


So there's a light at the end of the tunnel at the moment, as for my big surprise I have also gotten good photos with my D-SLR again, so yay :)

If you're interested of what I've been doing lately (with makeup I mean), go check out my facebook fanpage or my instagram.
I did peeking Magaman look...

And bright Sugarpill look....

..and simple Illamasqua inspired Valentines look...

.. pop art look inspired by Makeup Geek's Weekly Challenge

... and glittery "anti-valentine's day" look.


Oct 27, 2012

Halloween tutorial round-up

Here's some tutorials I've done that suit for Halloween!


Poison Ivy


PS. If you use my look this halloween, please be kind and send me pic to my mail (jangsara(a)gmail.com) or post a link here, and if I get enough pics, I'll do a post about your looks!

Oct 26, 2012

Halloween tutorial: Illamasqueyes

This is the look #3 from Illamasqua's Halloween facecharts:


Again I started with mixing some white to my foundation to create pale face:

Then I started to shape the eyeshadows by using a thin brush and black gel liner (pencil will do fine too):

When I had the desired shape, I applied matte black shadow to whole lid:

Then I applied Illamasqua's Bedaub Cream Pigment above the black shape (you can also use any light green cream product, or just white to make the color pop):

Over the cream pigment I applied Sugarpill's Midori shadow:

Then more Sugarpill, After party to the lower outer corner, below the black wing:

Then some black, make quite heavy line to your lower lashline with black, also make a wing to the inner corner too:

And add Sugarpill Afterparty below the inner wing too:

Looks quite scary :D

Then line your waterline with black:

Apply mascara, and false lashes to the lower lashline (mine are Faux Black Sparkle) (I also used falsies to the upper lashline, brandless cheap lashes):

Still scary!

Then I used lash glue to attach large black rhinestones:

And to make it a bit less scary looking, I added myself eyebrows with blue eyeliner:

I finishes the look with Illamasqua Disciple lipstick and a hint of Illamasqua liquid metal Surge on the lips:
Head jewellery from  Athene Nocturna